Popular Posts

January 14, 2017

Crispy Baked Truffle Fries


Truffle fries have been super trendy over the past ten years or so and I for one am not yet sick of them and probably never will be. I'm a french fry freak. They're my weakness and I love them with my whole heart. Truffle flavor just makes them absolutely irresistible which is bad and good but mostly good.

Baking them at home is less fattening than frying them but who really cares about that. It's really about the convenience factor for me because honestly frying food is messy and it makes your house smell like a McDonald's for three days. If I can toss them in truffle oil and bake them and get them crispy at home I am one happy camper.


I made these truffle fries as a side to my Shaved Steak and Blue Cheese Pizza and saying I was in heaven would be an understatement. Every bite was a gift.. it was magical.. I was in love. They're crispy and flavorful and actually taste like a potato. That seems unnecessary to say but some french fries don't even taste like potatoes! Who knows if some fries are actually even potatoes - you never know these days.

The recipe calls for two large russet potatoes. From my experience, this fills one large baking sheet without overcrowding the pan. Overcrowding the pan or letting the fries stack on top of each other is an absolute NO if you want crispy fries. They'll steam instead of evenly roast and you'll be disappointed. You'll still eat them but you'll be disappointed. The same thing generally happens if you have too much in the oven - try to just have this one pan for the best results. It's also important to note that the recipe calls for olive oil infused with truffle flavor which is easier to find in local grocery stores and way more affordable. I bet it's what your local restaurant uses. An option for an even more indulgent option is to warm up one tbsp of truffle oil in a pan with 1/4 tsp minced garlic over medium heat just until fragrant and toss the cooked fries in the oil. This allows them to mimic fried french fries more.

Sprinkle these with sea salt and dip in a homemade aioli for the ultimate snack or side dish. Whenever I bake french fries (or anything else that could use some extra oomph from an aioli which is basically everything and anything) I use my go-to simple mixture of mayo, lemon juice, garlic, salt and smoked paprika. Just season it to taste and you're golden!

Impress your friends, treat yo self, love thy neighbor - just make these.


It's all about the Pats today - the Texans don't stand a chance.... Let's get that W!


Crispy Baked Truffle Fries

Ingredients:

2 large russet potatoes
1 1/2 - 2 tbsp olive oil infused with truffles/truffle flavor
1/4 tsp smoked paprika
Sea salt & pepper
Option - additional 1 tbsp of truffle oil + 1/4 tsp minced garlic

Directions:

  • Preheat oven to 450.
  • Cut potatoes into your desired french fry shape - when baking them, you're best off to not cut them too skinny or too thick. Use your judgement, I've had the best luck with the size shown in the picture above. 
  • Lay them out on paper towels and pat as dry as you can.
  • Toss the potatoes in the truffle oil to coat, season with smoked paprika, pepper and salt and spread in a single layer on a baking sheet without overlapping or overcrowding. 
  • Bake in preheated oven for 25-30 minutes or until desired crispy-ness. Flip the fries once or twice to ensure they crisp evenly. 
  • Option to heat additional tbsp of truffle oil over medium heat with minced garlic for just a minute or so until fragrant. Toss cooked fries in warm oil to mimic deep fried fries.


January 11, 2017

Spicy Garlic Pickles


My sister Maria has always loved (been obsessed) with pickles, so I thought it would be a great homemade gift to add to her Christmas present.... and of course I made an extra couple jars for myself! These pickles are bursting with flavor and pack some decent heat. I asked my sister if she liked things moderately spicy or super hot and she said "burn my face off" so her wish was my command! Just kidding, these aren't that spicy, but they do have a serious kick which is delicious as a pickle snack or to make relish.

Here's a picture of my adorable sister about to enjoy her Christmas pickle!


Making pickles is much easier than you might think and it's great to be able to store the jars for later use. My pickling spice is a mixture of dill, cumin, mustard and coriander seeds, peppercorns, allspice berries, bay leaves, red pepper flakes and cloves. If you don't want them spicy and are looking for a classic pickle taste, just omit the red pepper.

The only downfall to making your own pickling spice mixture is that these ingredients, specifically the seeds, can be very expensive. This is the only time I'll recommend this as a money saving trick, so soak it in..... Go to Whole Foods. They have this AMAZING bulk spice section where you can take just what you need and it's cheaper per pound than buying already in the jar. If this is too much work, you can just buy some pickling spice at your grocery store and use that instead.


The jars look beautiful with the medley of different colored spices and they smell so good. It's a perfect acidic bite between mouthfuls of sandwich or a quick snack with a handful of potato chips! 

When making pickles, it's important that the jars are sterilized well and the lid suctions when the jars have completely cooled. This means the center of the jar lid no longer pushes inward if you press your finger on it, you'll know it's sealed completely and safe to leave on the counter unrefrigerated. 

The recipe makes approximately 4 pint jars of pickles.


Spicy Garlic Pickles

Ingredients:
2 tbsp whole mustard seeds
2 tbsp coriander seeds
2 tbsp dill seeds
1 tbsp allspice berries
2 tsp black peppercorns
1 tsp crushed red pepper
5 crushed bay leaves
1 tsp ground ginger
Approximately 7 pickling cucumbers
12 cloves garlic (3 per jar)
4 thai red peppers (1 per jar) - optional for additional heat, and I mean HEAT
1 1/2 cups cider vinegar
1 1/2 cups white vinegar
3 cups water
4 tbsp kosher salt


Directions:
  • Mix together spice ingredients, from mustard seeds to ground ginger. Set aside.
  • Ensure jars are ready for canning. You can put them through the dishwasher or soak them in hot soapy water to sterilize and keep warm. 
  • Place 2 tbsp of the pickling spice in each of the jars, then add in the garlic and optional Thai chilis.
  • Wash and scrub cucumbers. Slice into your preferred width for pickle spears/chips. Fill jars as much as you can without smashing the cucumbers - leave about 1' from the top of the jar. 
  • In a medium saucepan, bring the cider and white vinegar, water and salt to a simmer. 
  • Pour brine into the jars and fill, leaving about 1/2 inch from the top. 
  • Place lids on the jars - use tongs to avoid contamination or thoroughly wash hands just before. 
  • Process the jars by setting them in simmering (not boiling) water - the water should rest no more than 2 inches up the sides of the jar. Let them sit in simmering water for 10 minutes, then remove the jars and set them on the counter to rest. 
  • When the jars have completely cooled, the tops should have sealed tight so the lids don't press in like a button. 
  • Let them sit to pickle for at least ten days and enjoy! Store in the fridge after opening and eat within a couple weeks.  


January 7, 2017

Shaved Steak Pizza w/ Blue Cheese Sauce & Caramlized Shallots


I love pizza. Breakfast, lunch, dinner, drunken late night snack...any time, any place, any toppings. Onions, mushrooms, sausage, ham, pineapple, jalapeno, feta, spinach, buff chick, bbq chick, olives, peppers, SHAVED STEAK & BLUE CHEESE SAUCE! Extreme emphasis on the latter because A. I'm blogging about it today (duh) and B. I think it's the best pizza I've ever made. It's my masterpiece.... my masterpizza, if you will.

Creamy gorgonzola sauce with caramelized shallots and a hint of worcestershire, tender shaved steak with stretchy, melty smoked mozzarella and sharp, nutty parmesan, topped with a few generous shakes of red pepper flakes.... all atop a crisp pie with a tender, chewy, pillowy crust.


Every time I make something, I ask my boyfriend for constructive criticism so I can make note of it and improve for next time. When I made this he said "nothing, maybe you could sprinkle gold flakes on it". I agreed.....yes, it's perfect.


One of my favorite meals I've made and you often see in classic steak houses is a grilled ribeye or NY strip with a blue cheese sauce and crispy onions (I made it and blogged it which you can see here). I was thinking I'd make that for dinner when my boyfriend suggested pizza and BAM an idea was born. It's rich, savory and comforting, and different from your usual red sauce recipe so it's extra special to make for the ones you love! If you want to get super crazy with it, top the pizza with fried onions....

A good tip to keep in mind is to buy gorgonzola or stilton cheese rather than a store brand or other "blue cheese". This is because "blue cheese" is an unprotected term, so any cheese with blue mold on it can be given that name. Gorgonzola and Stilton are protected terms so it's a safer bet for flavor and quality for any recipe you use. Another good tip if you're from the Portland, ME area is to use Portland Pie dough as your crust if you're not looking to make one yourself - it's the best. They have never disappointed me and have multiple flavor options.... and they're products are sold in most major grocery stores in ME! (And yes I'm available for sponsorship.) I used sourdough for this one.

If you're like my mom and you're disgusted by blue cheese (and she hates goat cheese too which just blows my mind) don't be afraid of this recipe! The butter, cream and other cheeses mellow out the blue cheese flavor just perfectly. I promise you'll love it!


Shaved Steak Pizza w/ Blue Cheese Sauce

Ingredients:
2 tbsp butter
1 large shallot, sliced thinly
1 clove garlic, minced
Salt & fresh pepper
1/4 cup heavy cream
2 tsp worcestershire sauce
1/4 cup gorgonzola crumbles
Pizza dough
Handful of fresh baby spinach
1/4 lb shaved steak
1/2 cup smoked mozzarella, grated
Sprinkle of shredded parmesan

Directions:

  • Preheat the oven to 450 degrees. If you're using a pizza stone, place it in the oven while it preheats - this allows for a crispier crust on your pizza.
  • To prepare the blue cheese sauce, melt the butter over medium heat in a small saucepan. Add the shallots and cook to caramelize and brown a bit, about 7 minutes. Add the garlic and cook until fragrant. Toss in a pinch of salt and a bit of fresh ground pepper to season.
  • Reduce heat to medium-low and add the heavy cream and worchestershire sauce. Simmer a couple minutes to thicken a bit and then stir in the gorgonzola to melt. Set aside. 
  • Meanwhile, heat a couple tsp of olive oil in a skillet over medium high heat. Season the steak with salt and pepper and cook just for a couple minutes until almost cooked through - it will cook more in the oven so don't worry about cooking it completely as it will dry out. Chop it when its cool enough to handle so you don't have large stringing pieces on your pizza.
  • Stretch out your dough and place on a pan or pizza stone. Option to brush a bit of olive oil and garlic powder on the crust. 
  • Brush the blue cheese sauce on the pizza, top with fresh spinach leaves in one single layer - it's more for color so don't go crazy loading it on! Then top with the shaved steak, smoked mozz and a sprinkle of shredded parm. 
  • Bake in preheated oven for about 15 minutes or until the bottom is cooked and crispy to your liking and the crust is golden brown. 


January 3, 2017

Hot Pepper & Cucumber Infused Vodkas

I like making homemade things (booze, specifically) for yankee swaps around Christmas. First, because I'm thrifty (aka thoughtful) and second because it's fun for me to get creative and come up with something I think people will like....And if they don't I'll just end up with it! :)

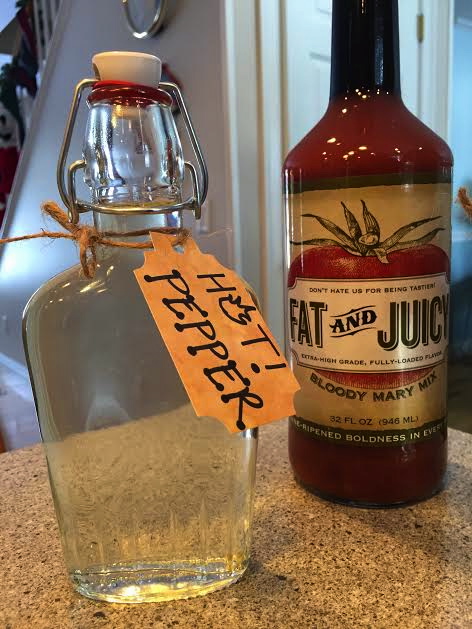
Last year I made homemade Irish cream liqueur which was well received and seriously delicious in coffee... or straight on ice let's be real. This year, I wanted to change it up again and decided to infuse vodka with hot peppers and cucumber and bottle them to gift with bloody mary mix, hoping that the yankee swappers would love bloody marys as much as I do.


Infusing is easy and it really takes on the flavor of whatever ingredient you choose. Both of these infusions could be used in martinis, multiple cocktails and of course bloodys. Cucumber is one of my favorite flavors in boozy drinks and it pairs well with basil (added option in recipe), mint, lemon, lime, melon, tonic, ginger, hot peppers, blueberry, strawberry... you name it! It's mild and refreshing and really is limited to your imagination. For the hot pepper, think pineapple, cucumber, ginger, olives, etc.

They are delicious enough to just be sipped on ice!


Beware when infusing with the peppers because the vodka will take on a lot of heat! For me, that's wonderful as I do love my bloodys and martinis on the spicier side. If you're a bit weaker, reduce the infusion time and/or the amount of peppers you infuse with and know the heat level of your peppers. Jalapenos are usually a crowd pleaser, while serranos are spicier and habaneros are hot as hell. For any infusion, you can always taste it to see if it has the amount of flavor that you want and if it's not quite there yet let it steep a bit longer.

My favorite part is when you open up the jar or bottle, you can clearly smell what it is infused with and it just makes me want to chug the whole bottle! But what else is new...

In my recipe below I use a pint jar as the vessel because I figure most people have those lying around and it's easy to fit the peppers/cucumbers in. From there, funnel them into cute little bottles for gift giving or convenient, easy to pour storage in your own cabinet. It's a great thoughtful gift for around the holidays or just a great weekend cocktail for yourself!

PS - Both of these infusions would work for other liquors, such as tequila with the peppers and gin with cucumbers


Hot Pepper Infused Vodka

Ingredients:
1 pint good quality vodka
1 jalapeno pepper, cut in half and nearly completely seeded (or half of one jalapeno, half of a serrano)

Directions:

  • Fill jar nearly to the brim with vodka.
  • Add the pepper to the jar. A few seeds go a long way in terms of spice so don't overdo it, you're better off to remove nearly all of the seeds.
  • Close the jar tightly and let the vodka sit for at least 24 hours and up to 4 days, shaking the jar a bit and tasting to see if it's reached your spice preference.


Cucumber Infused Vodka

Ingredients:
1 pint good quality vodka
1/2 cup chopped cucumber
(Optional 1 fresh basil leaf to get even fancier!)

Directions:

  • Fill jar nearly to the brim with vodka.
  • Add the cucumber to the jar.
  • Close the jar tightly and let the vodka sit for at least 24 hours and up to 4 days, shaking the jar a bit and tasting to see if it's reached your flavor preference.


December 29, 2016

Chicken Tikka Masala


I'm a huge fan of Indian food. The aromatic spices, tremendously flavorful sauces and curries, warm and chewy naan bread, and simple and affordable core ingredients like fresh vegetables, lentils and rice. Though I am no expert in the cuisine (such as when I go to Indian restaurants, there are still things on the menu I am not sure what they are) I have dabbled with a few recipes. I'm now confident in my abilities to make a damn good Indian curry with freshly toasted and ground spices, delicious naan on cast iron (because I don't have a tandoor oven....yet) and an amazing chicken tikka masala.

Tikka Masala was the first Indian dish I ever tried and I remember my eyes growing wide with the first bite that was tender chicken smothered in a perfectly balanced, spicy and creamy sauce spooned over basmati rice. Even with growing up with absolutely no Indian food cooked in my house, Tikka Masala is comfort food to me. It's the stick-to-your-ribs-warm-you-from-the-inside-make-your-day kind of meal.... It's the best.


I served this over quinoa for added nutrition, and it absorbs the flavorful sauce wonderfully. I am a huge fan of basmati rice though, so either way you can't lose. This recipe encompasses all the traditional flavors and enhances the ones I love to taste (and smell) the best. It's fantastic.

There actually is some dispute one where tikka masala actually originated. Some say it was an Indian restaurant in Scotland that created it by accident and continued to make it because it appealed to the folks there and others say it is from Northern India/Pakistan. Regardless of where it originated and whether or not it is a traditional Indian dish, the spices and ingredients are staples of Indian cuisine and that makes it good enough for me! Additionally, it's often served in Indian restaurants so making it yourself at home will fulfill any takeout cravings you have :)


It's a perfect recipe to warm up this winter and it's quick enough for a weeknight meal.


Chicken Tikka Masala

Ingredients:
10 cloves of garlic, minced
1/4 cup fresh minced ginger
2 tbsp canola oil
1 cup plain yogurt
1 1/2 lb chicken thighs cut into bite sized pieces
3 tbsp butter
2 serrano peppers, seeds removed & chopped** (can use one if you don't like too much spice)
3 tbsp tomato paste
1 tsp garam masala
2 tsp cumin
1 tsp curry powder
2 tsp paprika
6 plum tomatoes, diced
1 1/2 - 2 tsp salt
1 cup water
1/2 cup heavy cream

Directions:

  • Make a paste from the garlic and ginger by placing them in a food processor and pulse, adding the oil until a paste forms. You may need to add a tsp or two more oil to get that consistency. 
  • Take about 3 tbsp of the paste mixture (save the rest) and whisk it into the yogurt. Add a few shakes of salt and pepper and marinate the chicken for at least one hour to overnight. 
  • To make the curry sauce, add a quick drizzle of olive oil and the 3 tbsp of butter to a large skillet or pot to melt the butter over medium heat. Add the remaining ginger garlic paste and the serrano peppers and cook until the edges are lightly browned. 
  • Add the tomato paste cook, stirring constantly to mix with paste, for about 3 minutes.
  • Add the garam masala, cumin, curry powder and paprika and stir to toast the spices a bit, just for a minute.
  • Add the tomatoes, 1 1/2-2 tsp of salt and the diced tomatoes. Mix all ingredients together, bring to a boil then reduce heat to simmer and cook for about 20 minutes to draw out liquid of tomatoes and thicken the sauce. 
  • Meanwhile, heat grill (you can cook the chicken on the stove but you really need to shake off all the excess marinade so it's not simmering in a skillet of yogurt!), grease lightly and cook the chicken for a couple minutes each side. It will continue to cook in the sauce.
  • Puree the sauce with a blender or immersion blender until smooth and add back to the pot. Add the chicken to the pot and bring to a simmer to finish cooking the chicken, about ten minutes.
  • Stir in the heavy cream to finish.
  • Serve over basmati rice or quinoa with naan bread.


**You can use jalapeno instead, it's milder than a serrano, but the green color of it may slightly change the beautiful orange sauce color so I wouldn't 100% recommend it.


December 27, 2016

Banana Coconut Waffles


Christmas is a wonderful time because it's filled with family traditions, old and new. Every year since I can remember, my family has gone out to breakfast Christmas Eve morning and then to my Aunt Renee's house for a party in the evening, always with amazing food and cocktails. On Christmas morning we open presents at my house and then head to my Grammy's house in Amesbury, MA to once again gather with the whole family. We order Chinese take-out, have a yankee swap and always happily over indulge in an impressive table spread of desserts. These traditions have stuck for years, but some fade out as we all get older, such as when we were younger, we'd all sleep on the floor in my oldest sister's room on Christmas Eve and my parents would read us The Night Before Christmas. The excitement is no longer worth sacrificing the comfort of my bed (and our rooms aren't really "ours" anymore as three of us have flew the coop) and I don't believe my brother could fit in that box anymore.... or the Pikachu costume :)


One of the newer traditions we've developed is to cook a big breakfast Christmas morning for my grandparents who recently moved into an addition on our house and my Aunt Karen and Uncle Rick. My aunt and uncle's children have grown up and are married so they alternate the days they celebrate Christmas together, which allows them to come join us Christmas morning for breakfast!

Here's the Christmas morning crew enjoying their meal!


This tradition is fun for me because I get to take the reigns for breakfast preparation and decide what to make. This year, we catered to everyone's dietary restrictions with vegan/gluten free banana coconut Belgian waffles, traditional Belgian waffles, bacon, sausage, scrambled eggs, hashbrowns, juice and coffee. I was so happy with the way the waffles came out and couldn't wait to share the recipe! My sisters definitely approved...


You know the recipe is a good one when you're taste testing crew is made up of ten people with different taste preferences and they all love it. These banana coconut waffles are crisp on the outside, and moist and tender in the middle. They don't have the same super light/fluffy texture of traditional Belgian waffles - they are more like a quickbread but they're absolutely fantastic. They smell amazing when you're cooking with the flavor combination of bananas, coconut and cinnamon. If you're not a huge fan of bananas, don't shy away from this recipe because the banana flavor is fairly mild. They are sooooooo good.


This recipe is sure to please anyone, whether or not they're vegan/gluten free, and it's a great treat for a special occasion! It's healthy too, without sacrificing any great taste. My aunt even said it was her favorite thing on the plate, even compared to the traditional Belgian waffles! This is a recipe I'm excited to save and use for holidays and cozy weekend mornings.


I hope everyone enjoyed their Christmas and has fun plans for the New Year!


Vegan & GF Banana Coconut Waffles

Ingredients:
1 banana, mashed
1 1/4 cup almond milk (or other non-dairy milk of your preference)
2 tbsp flaxseed meal
1/4 cup coconut oil (melted)
2 tbsp maple syrup or agave
1 tsp vanilla
1 cup almond meal
1/2 cup oat flour (oats ground in food processor)
3/4 cup gluten free flour blend
1 tbsp baking powder
1/2 tbsp arrowroot powder
1 tbsp cinnamon
Pinch of nutmeg
Pinch of salt
1/2 cup shredded coconut

Directions:

  • Mix together banana, milk, flaxseed, coconut oil, maple syrup and vanilla until well combined.
  • In a separate bowl, mix together remaining ingredients except for the shredded coconut. 
  • Whisk the banana mixture again to incorporate any banana that may have sunk to the bottom of the bowl and pour into the dry mixture. Stir just to combine then fold in the coconut. 
  • Make sure your waffle irons are hot and ready - a Belgian waffle iron or a regular iron works fine. Spray it well to grease it. A lot of waffle irons come with a cup that measures the correct amount to add to the iron, but generally it's around 1/2-1 cup of batter - use you're judgement. 
  • Cook the waffles until the waffle iron dings that it is complete or generally about 4-5 minutes.
  • Serve with maple syrup!


December 18, 2016

Corned Beef Hash & Holiday Celebrations!

Well it's been quite a while since I last posted and a lot has changed! Long story short, I have a new job and a new apartment in Portland, I'm in graduate school and over the past few months I've had virtually no free time to write, so I took a bit of a hiatus...... But by popular demand (actually only like three people asked me) the blog is BACK! I'm so excited to share some delicious recipes I've made during my blogging off season, and it's perfect timing with the holidays coming up.

To kick of the restoration of my blog, I want to share a recipe for one of my favorite foods in the entire world. It's invariably the star of any brunch spread, it'll cure the worst hangover you've got and when it's served with nature's gravy (runny yolk, people) it's quite possibly one of my favorite bites on earth. Wash it down with a spicy bloody mary for the ultimate dining experience...


We had a little Christmas brunch celebration with a group of friends and it was fantastic. Everyone made a dish and our final spread included a variety of pancakes, copious amounts of bacon, coffee cake (I'll be blogging that later!), smoked salmon crostinis, eggs baked in french bread, mimosas, homemade bloody marys and of course corned beef hash. It was such a wonderful way to get in the holiday spirit and spend time with great people.... and of course dance to Christmas music which is just about my favorite thing on earth to do.


All of us were in unanimous agreement that canned corned beef hash just isn't right. That's not to say I haven't eaten it (and enjoyed it) from time to time, but its greasy mashed cat-food-ish consistency and instant artery clogging capabilities don't nearly compare to a homemade hash with tender actual shreds of beef and fresh veggies. I enjoy a hash where the meat-to-veggie ratio is a solid 3-1. I used 3 lbs of corned beef and two large russet potatoes, one large carrot and one onion. This way, you aren't skimping on the beef which is of course the best part! To send this home even further, I cook a few pieces of bacon and use the rendered fat instead of oil. I was pumped to make it and share it with all my buds to celebrate the holidays; Nothing makes me happier than cooking for friends. My boyfriend is a self proclaimed hash connoisseur and he said it was one of the best he's had so that's a good sign!

Most corned beef briskets come with a spice packet, but I prefer to mix my own (see corned beef mix recipe at the bottom of page). If yours doesn't come with a spice packet and you'd rather not make your own, pickling spice works just fine; they often have a recipe for corned beef on the side of the label! You can cook the beef the night before and keep in the fridge for quicker prep in the morning/more hands free time to drink your bloodys!

With a fresh coat of snow on the ground and Christmas right around the corner, it's hard not to be overjoyed spending time with good people and overindulging in delicious food and many drinks! If you're having friends or family over for brunch, or you just want to treat yourself, this is a perfect recipe that'll put a smile on anyone's face.

Happy Holidays and enjoy cooking for all the wonderful people in your life!


Corned Beef Hash

Ingredients:
3 lbs corned beef brisket, cooked and chopped/shredded, whichever you prefer
3/4 pieces of bacon
1 large onion, chopped
1 large carrot, grated
2 large russet potatoes, grated
Salt & pepper
1 tsp thyme
Fresh parsley

Directions:

  • Cook bacon over medium-high heat in large skillet (the larger the better as you want as much surface area to crisp those potatoes) until crisp. Remove from pan and reserve a couple tablespoons of the drippings. If there isn't about 3 tbsp, add a tbsp bit of butter :)
  • Add chopped onions to the pan and cook until it is beginning to brown. 
  • Make sure potatoes and carrots are as dry a possible, you can place them in a paper towel and squeeze moisture out. If they're very moist they will steam instead of crisp. Add them to the pan with the onion. Add in the dried thyme and season with pepper. Be careful about adding salt because the corned beef is likely already quite salty.
  • Cook until tender. This will take about 15 minutes.
  • Stir in the corned beef and crumbled bacon and cook until it's warmed through and crispy... Remember to scrape the crispy bits off the bottom of the pan, those are gold. 
  • Garnish with chopped fresh parsley and serve with nature's gravy.


Corned Beef Spice Mix

Ingredients:

1 tsp coriander seeds
1 tsp dill seeds
1/2 tsp mustard seeds
1/2 tsp allspice berries
1/2 tsp black peppercorns
three cloves
2 bay leaves

Directions:
Mix together spices and use when simmering or slow cooking a corned beef brisket.