Popular Posts

December 29, 2015

Homemade Irish Cream


With the holiday season comes dozens of yankee swaps and gift giving and sometimes it's hard to choose just what to give. Homemade gifts are so thoughtful and if it involves liquor then you may have hit the jack pot, especially if it's festive! Irish Cream (aka Bailey's) is a wonderful addition to a cocktail or a delicious treat in your Christmas morning coffee.

It's a simple recipe and stays good in the fridge in an air tight container for months! Plus, you can have a lot of fun decorating them in adorable bottles. I gave mine away with a bag of local, organic coffee.


I use Jameson but you can use your favorite Irish whiskey. This recipe has chocolate, coffee and almond in it, giving it a similar flavor to Bailey's. This recipe has a bit higher alcohol content than Bailey's though, which is my personal preference but you can alter the ingredients as you wish. In my opinion, you want the whiskey flavor to shine a bit and not just be masked by heavy cream. 

As I said, it keeps good in the fridge for a few months. It does thicken in the bottle, so before serving you'll want to give it a good shake and it will loosen right up to be poured into a delicious coffee drink!


Happy Holidays!!


Homemade Irish Cream Liqueur 

Ingredients:
1 1/4 cup Irish Whiskey
1 cup heavy cream (do not substitute with half and half or milk, it doesn't work)
1 14oz can of sweetened condensed milk
1 tsp instant coffee
1 tbsp chocolate syrup
1 tsp vanilla
1/4-1/2 tsp almond extract

Directions:
  • Pour ingredients into blender and mix until combined. 
  • Pour into air tight containers and store in fridge. 
  • Shake well before serving.


December 10, 2015

Homemade Oreos


My favorite reason to cook is for special occasions. Good food brings people together and it's great to be the person that provides that. There's something so special to me about baking a pie to share on Christmas, or breakfast for the family on Mother's Day. I find I even get more excited for other people's birthdays than my own because I get to learn about their favorite treats and make something just for them.

Two of my colleagues, David and Josh, have birthdays in December and I wanted to make them something. I asked for a hint of what they would like and I was told they both loved Oreos. My mind immediately started jumping to all of these different ideas that involved Oreos in some way. I was thinking way outside the box about this elaborate trifle dessert when it hit me; I should just make homemade Oreos.......Duh! It's the type of thing that's just so obvious that you don't even think of doing it.

Well, they aren't hidden in plain sight anymore because they made their big debut in the office today and I will 100% be making them again.


The decadent chocolate cookies are crisp yet chewy, and the filling is sweet and creamy. Consider them your packaged Oreos on steroids.

The thing I truly loved about these cookies is that they are uncommon, at least as far as I know. I have never had or seen homemade Oreos before, but wherever you bring them they are sure to be a hit just based on how well loved the classic packaged cookie is. It's a thoughtful, homemade version of the cookie so many of us loved as kids (and now), which gives them an element of nostalgia. That's always a huge bonus for a food item!!


Here's a fun fact: Oreos are vegan. I know this because my sister is a vegan and has been since she was 11. No offense to her, but you have to assume these must be better than the packaged cookies because: A. they are homemade B. they have butter.

They are even Hilnur approved! (My sister's Irish Wolfhound mix - don't worry, we didn't let him have the chocolate but he definitely gave it a solid attempt!)


This is a delicious recipe that will please any crowd and be a thoughtful gift for your Oreo loving friend or family member!


Homemade Oreos


Ingredients:
1 1/4 cups of sugar
1 1/4 sticks of butter, softened
1 1/4 cup of flour
1/2 cup unsweetened cocoa powder
1/4 tsp salt
1 tsp baking soda
1/4 tsp baking powder
1 egg
Filling:
1/2 stick butter, softened
1/4 cup vegetable shortening
2 cups powdered sugar
1 tsp vanilla

Directions:
  • Preheat oven to 375.
  • Mix flour, cocoa powder, salt, baking soda and baking powder until thoroughly combined.
  • Cream together butter and sugar in standing mixer. Slowly mix in flour (just pulse) until nearly combined then add the egg. Mix until it is just formed into a dough.
  • Using a small spoon/teaspoon, scoop the dough and roll into 1/2" to 1" balls. Spread out on parchment paper lined baking sheet. 
  • Press the balls down slightly to flatten just a bit. 
  • Bake in preheated oven for 9 minutes. The tops will look nicely cracked like the image above. 
  • For the filling, gradually beat powdered sugar into butter and shortening in a standing mixer. Add in vanilla and beat on medium-high until the filling is light and fluffy - about 2 minutes. 
  • Once cookies are cooled, use a pastry bag (or a strong plastic bag) to pipe the icing onto cookies and make sandwiches.


December 6, 2015

Almond Raspberry Thumbprint Cookies


This time of year is a time to celebrate, share and give not only to those who you know and love, but those who aren't quite as fortunate and could use a little help during the holidays. My firm ran a food drive for the Seacoast Food Pantry and the NH Food Bank and I was thrilled with the results. Together with our clients (all located in NH/MA) we were able to donate nearly 2,500 pounds of food! You can check out the article on my company site here.

It was heartwarming to see how generous the local businesses are, and of course I thought they deserved a homemade treat to thank them for their voluntary participation. After making pumpkin cookies for clients of mine who participated in the Epilepsy Foundation clothing drive, I knew I had to follow up strong. Sugar cookies are a well known holiday treat and I felt they would be a perfect way to say thanks ("thank yous" that are edible are the best kind of thank yous).

They can be dressed up to look fancy and they are loaded with butter.... It is clearly an obvious choice.

I love this recipe because there is a perfect balance of buttery, almond cookie and sweet filling. They look beautifully festive and can hold their own on a table spread of even the most gourmet holiday treats. I got rave reviews from clients I gave them to, so I know the recipe is worth sharing!


The fun part about this recipe is that you can get a little creative. Feel free to experiment with different types of jams (raspberry, strawberry, cherry, apricot, etc!) and toppings such as icing or a light dusting of powdered sugar. One thing I would not recommend substituting is the almond extract for vanilla in the cookie. The almond gives the cookies a delicious nuttiness, and the vanilla flavor just seems to fall short in comparison.

My last tip is for those of you who love to cut corners in the kitchen (don't worry, I do sometimes too). Don't skip the step of freezing the dough. These cookies have a healthy dose of butter in them and will spread thin causing the jam to run if you don't freeze them before cooking.

Now that I have shared my last piece of wisdom, let the holiday cooking commence! Fa-la-la-la-la La-la-la-laaaa!


Almond Raspberry Thumbprint Cookies

Ingredients:
2 1/2 cups flour
1/4 tsp baking soda
1/4 tsp salt
2 sticks butter, room temp
3/4 cup sugar
1 egg
1/2 tsp almond extract
1/2 cup raspberry jam or jam of choice
Icing:
1/2 cup powdered sugar
1/2 tsp vanilla
half and half

Directions:
  • Sift together flour, baking soda and salt. 
  • In standing mixer, beat butter and sugar until light and fluffy - about 3 minutes.  Scrape the sides of the bowl occasionally. Add egg and vanilla and beat for about a minute more, until fully mixed. 
  • Mix flour mixture into butter mixture, slowly and a little at a time until it starts to combine. It will be a bit crumbly but it will form a ball. 
  • Roll the dough into 1 inch balls and place spread out on an ungreased cookie sheet. Using your finger (or get this - a chap stick tube works beautifully and is so much easier!) press a hole into the top of the cookie, about halfway through to the bottom. Fill with jam but don't over flow. 
  • Freeze the cookies on the cookie sheet for at least 1 hour. 
  • Preheat oven to 350 and bake cookies one sheet at a time in preheated oven for about 15 minutes or until just lightly golden. Let cool ten minutes then move to a wire rack.
  • While cookies are cooling, mix powdered sugar, vanilla and 1 tsp of half and half or milk at a time until it just turns to icing consistency. Pour into plastic bag and cut the corner to ice.
  • Drizzle icing over cookies once they are completely cool.


November 29, 2015

Gluten Free Banana Nut Muffins


Some days when I write I feel like I am a hybrid of a creative wizard and a Food Network star that was born to describe food. Other days I feel like I couldn't describe a dish if someone hit me in the face with it. Blogging after work can be tough. You use all your brain power during the work day and when you finally get home and take the muffins out of the oven and sit down to write a creative post, all you can think of is "muffins are good". I sat at my computer for 20 minutes racking my brain trying to describe banana muffins and all I could come up with is that one, feeble sentence.

Over the past 3 or so years I've been blogging, I have found ways to kick the mind-block aside. You either eat more of the food you are trying to blog about, sit in front of the computer and type, erase and type again until good sentences flow, or just take a break and give it a try later. Taking a break is precisely what I did because I made these muffins about two weeks ago and just didn't have the time or energy to share their marvelous recipe.


Two weeks is selfishly long to keep this recipe to myself. These muffins are extremely moist and flavorful yet fairly light by using applesauce instead of some oil which lessens the fat content and increases nutritional value. It is everything you could want in a muffin and a great way to use up over ripe bananas while filling your home with the warm, cinnamon scent perfect for the holidays!

To make mine gluten free, I prefer to use this Bob's Red Mill all purpose gluten free flour that has xanthan gum conveniently pre-blended in. I have had great results from using it and it worked especially well in these muffins!


They're perfect for breakfast, snack or dessert. I love having them made and looking forward to a delicious on-the-go breakfast for those days you feel a little too lazy to make breakfast. I don't know about you but those days increase for me during the winter months!


Gluten Free Banana Muffins

Ingredients:
1 cup mashed banana (approx 3, black spotted ripe bananas)
1/2 cup sugar
1/4 cup brown sugar
2 eggs
1/2 cup unsweetened apple sauce
1/4 cup oil
1/4 cup orange juice
1 tsp vanilla
1 1/2 cups Bob's 1 to 1 gluten free baking flour (if using a regular gluten free flour, add 3/4 tsp xanthan gum)
3/4 tsp baking soda
1/2 tsp salt
1/2 tsp cinnamon
1/4 tsp nutmeg
1/3 cup chopped walnuts or pecans

Directions:
  • Preheat oven to 350 and line muffin tins with paper liners or grease. 
  • Beat bananas, sugars, eggs, applesauce, oil, orange juice and vanilla until smooth. 
  • In separate large bowl, mix flour, baking soda, salt, cinnamon and nutmeg with a wire wisk to combine.
  • Slowly mix dry ingredients into banana mixture. Don't over mix!
  • Fill muffin tins 3/4 full with batter and top with a sprinkling of nuts.
  • Bake in preheated oven for 20-25 minutes or until toothpick comes out clean.


November 18, 2015

Spiced Carrot Soup with Orange


One of my favorite things about my job is that it allows me to get to know countless businesses in the local community. I am constantly meeting with local human resource managers and finance executives and learning about their company and their personal backgrounds.

During a recent Seacoast Human Resource Association meeting I happened to sit next to a woman who works for a company that is right up my alley (of course it involves food). The company is called Dig In. Their goal is to help individuals and companies by educating and coaching on the power of eating healthy. The healthier your work force is, the happier they are and the better they will perform. I really appreciated their mission and was excited to try a recipe of theirs.

At the meeting they gave everyone an adorable pre-mixed spice packet with all the seasonings necessary for their carrot soup recipe. (I promised Vicki from Dig In that I would make the soup, blog about it and send her the link - So Vicki, this is for you!)


This quote in its many variations always makes me smile because I grew up with a mother that teaches cooking and I have taught many friends tricks of the trade as well.


The soup is delicious. It has great warm flavor from the spices and is lightened up by the splash of orange juice. Additionally, the carrots are roasted before putting in the soup which brings out their sweetness.


The texture reminds me of pea soup, which I love (but absolutely HATED until I was about 15). I brought a bowl to work for lunch along with a nice piece of steak. I'm not sure if that is exactly what Dig In would recommend but I'd say it was a great combo!


For more information about Dig In, check out their website! www.diginrealfood.com


Roasted Carrot Soup w/ Cumin, Ginger & Orange
Ingredients:
2 lbs carrots, peeled and chopped into 1" chunks
Olive Oil
2 tsp onion powder
1/2 tsp garlic powder
1 tbsp cumin
 1/8 tsp paprika
1 tsp ground ginger
4-5 cups chicken stock
1/2 cup fresh orange juice
Salt and pepper to taste

Directions:
  • Heat oven to 425 degrees. Toss carrots in olive oil and season with salt and pepper. 
  • Roast in preheated oven for about 30 minutes, stirring halfway through.
  • Heat soup pot on medium heat and drizzle with oil. 
  • Add onion powder, garlic powder, cumin, paprika and ginger. Stir for two minutes, until aromatic. 
  • Add carrots and a sprinkle of salt and pepper. Stir well to mix. 
  • Add chicken stock and bring to a boil. Turn heat to low, cover and simmer for about 10-12 minutes or until carrots are very soft. 
  • Uncover and let cool slightly. 
  • Puree soup in small batches in a blender or use an immersion blender. 
  • Stir in OJ. 
  • Garnish with cilantro or mint. 


November 10, 2015

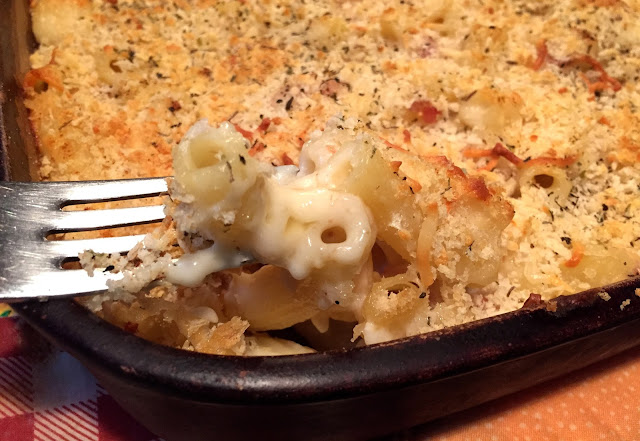
Homemade Bacon Mac & Cheese


Nothing says "Thank you for your service to our country" on Veteran's Day like homemade mac & cheese.

Well....... there are probably more appropriate offerings, but in the end no string of words or baked dish will ever really say thank you quite enough for what some men and women give up for our safety. With that being said, small gestures can go a long way and any cheesy comfort food can go an extra long way (especially if it feeds the entire office).

I decided to make mac and cheese for my colleague who served after a client of mine gave me a couple boxes of Stonewall Kitchen organic pasta. (I will always have a soft spot for SWK because I interned there and fell in love with the overall vibes of the company as well as multiple products of theirs.) I knew my colleagues would, as usual, eat it during what would be considered breakfast time to the general population (because they're vultures). Therefore, I figured if I added some bacon we could just pretend it was meant for breakfast.


There are recipes out there with 100 different cheeses in them that I have made before and they never seem to taste better than the classic. This is a no-frills mac. Really all you need is extra sharp cheddar, parmesan and in this case, bacon. Don't go over board with the bacon, though. I would definitely stick to the three/four pieces the recipe states because you don't want to overpower all of the sharp, nutty, creamy flavors of the cheese.

It's a broken heart mending, taste of home type of recipe. I suppose my thought process is that if I was over seas and I came home, I would want a dish like this.


I topped the macaroni with panko crumbs but crushed Ritz crackers would do the trick as well. It's such a simple recipe that is heart warming and comforting and a great dish for the changing of seasons. I don't know about you, but my butter consumption increases tenfold between November and February and that is how I make it through winters in New England. Buttery, rich comfort foods; There's nothing better.


Happy Veteran's Day to all of those who serve our country and sacrifice so much of their lives for us, and a special thank you to my colleague Peter at BankW! 


Homemade Bacon Mac & Cheese

Ingredients:
12 oz pasta of choice (anything "tube" to best hold cheese)
3/4 slices of bacon
2 tbsp minced onion
2 tsp minced garlic
1/4 cup butter
1/3 cup flour
3 cups milk
14 oz extra sharp cheddar cheese + a handful for topping
4 oz parmesan cheese + a handful for topping
1/2 tsp salt
1/2 tsp dry mustard
1/2 tsp chili powder or 1/4 tsp cayenne
1/2 cup panko breadcrumbs or crushed ritz
1 tsp Italian seasoning

Directions:
  • Preheat oven to 350 and butter a 9x13 baking dish.
  • Cook pasta according to package directions, minus 1-2 minutes to allow pasta to cook fully in the oven. 
  • In a large pot, cook bacon over medium heat. Remove from pot but leave grease. Turn heat down a bit to prevent burning and add in onion and garlic. Cook for 2 minutes then add in butter. 
  • When butter is melted, add in flour small amounts at a time and wisk to create a roux. If you have never made a roux before, it will look similar to mashed potatoes so don't freak out. Be very careful not to burn and stir frequently. 
  • Add milk slowly and wisk constantly. Cook for about 5-7 minutes or until sauce is thickened and just starting to bubble. 
  • Remove from heat and stir in cheeses, crumbled bacon, salt, dry mustard and chili/cayenne until melted. 
  • Mix pasta into cheese sauce and pour into prepared dish. Top with handful of cheddar and parmesan, Italian seasoning and breadcrumbs. 
  • Bake in preheated oven 40 minutes or until cheese is bubbling and crust is golden. 


November 7, 2015

Sour Cream Coffee Cake


No matter how much you like where you work, there will still be days you wake up and wish you had a stress free day off. There are days you get rejected and frustrated (especially in recruiting), but at the end of the week you go out for a drink with your coworkers and get pumped up for the next 5 day grind of pushing through it all. You arrive Monday morning, coffee cup(s) in hand ready to tackle the day and get people in jobs they're happy about.

Speaking of coffee cups....... After being with my firm six months now, I can say with substantial confidence that recruiters at Bank W Holdings likely consume a large majority of the entire state of New Hampshire's overall coffee consumption.

As an avid cook, this means one thing: Coffee cake.


What is a better pick-me-up than a sweet homemade treat that is literally meant to be washed down with a gulp of hot coffee? What could possibly be a more appropriate snack for the caffeine fiends at KBW? I answered myself this question by realizing that no matter what I make, it will be devoured by my coworkers before 10 am, regardless of if it was really intended for breakfast. Therefore, if it is an actual breakfast item AND pairs marvelously with your morning cup of joe, we've hit the jackpot.


This is my favorite coffee cake recipe. I first made it for Mother's Day back in high school and I haven't been able to even consider trying another recipe. It's exceptionally tender and moist (thank the sour cream for that) with the perfect amount of sweetness. The simplicity of it screams comfort food and with a tasteful drizzle of icing, it's a super crowd pleasing cake for breakfast or even dessert!

My colleagues gave me rave reviews, which makes my day because (it boosts my ego) it assures me that the recipe is worth sharing.


 My only request from you is that whether you make this recipe (obviously you should) or another, just abstain from using a box mix. Making it homemade is simple and 100% worth it.

Whether it's for your next holiday/special occasion breakfast or just a nice gesture to perk up your office Monday morning, you will be happy you made this!


Sour Cream Coffee Cake

Ingredients:
Cake:
1 cup sugar
1 stick room temperature butter
1 tsp vanilla
2 eggs
12 oz sour cream
2 cups flour
1 tsp baking powder
1 tsp baking soda
1/2 tsp salt
Topping:
1 tsp cinnamon
1/4 tsp nutmeg
1/4 cup sugar
1/4 cup brown sugar
1 cup chopped pecans
Icing: 
1 cup powdered sugar
2 tbsp half and half (or milk)
1/2 tsp vanilla
1 tbsp melted butter

Directions:
  • Preheat oven to 350. Grease a 9x13 pan.
  • Cream together butter and sugar with electric mixer until creamy. Slowly mix in sour cream.
  • Beat in one egg at a time and vanilla until well mixed. 
  • In separate bowl, wisk together flour, baking powder, baking soda and salt. 
  • Mix dry ingredients with sour cream mixture until combined. Don't over mix.
  • Mix topping ingredients together.
  • Pour half of the batter into prepared pan. Top with half of topping mixture. Add remaining batter on top (it will seem like it's hardly enough, but work gently to spread it evenly) and then top with remaining sugar topping. 
  • Bake in preheated oven for 30-35 minutes or until a toothpick comes out clean.
  • Mix icing ingredients together (can add more or less sugar/half&half to get best consistency). Wait until cake is completely cooled before drizzling or squeezing through a plastic bag on top.


November 2, 2015

Cheesy Stuffed Mushrooms


I have been making these stuffed mushrooms for years and I've always claimed they are the best I've ever had. I felt no need to alter the recipe because they're just perfect. Well, one thing I have learned to be consistently true is that there is always room for improvement in life, even in well loved recipes that you thought were the best they could be after making them a thousand times (but don't tell my mom that about her date nut bread). Generally my thought process is that cheese will make everything better (except maybe my mom's date nut bread), but in this case the mushrooms were already stuffed with cheese. Therefore there was only one other option..... Add a different kind of cheese. Genius, right?


Cue the smoked mozzarella.


Cream cheese, parmesan and smoked mozzarella oozing out of a tender mushroom, topped with a crunchy bread crumb topping with a hint of cayenne. Double the recipe (at least); you won't regret it. You can even make them ahead and freeze them without the crumb topping to save for later. They're fancy enough for any gathering yet fairly cheap and easy enough for any day of the week. They're also easy to make gluten free without the bread crumbs. A perfect recipe for the upcoming holidays!


Exhibit A: Cheese ooze, 5 O'clock


I bet you $10 that at least three people ask you for the recipe. (And that's about all the extra cash I have right now so that's serious confidence)


PS - You could do this recipe with regular mozzarella if you want. I HIGHLY recommend the smoked mozzarella though, because it adds a flavor that truly set these apart.


Cheesy Stuffed Mushrooms

Ingredients:
20 white mushrooms
1 tbsp olive oil
1 clove garlic, minced
6 oz cream cheese
1/3 cup parmesan cheese
1/3 cup smoked mozzarella cheese
1/4 tsp cayenne pepper
Salt and pepper
1/3 cup (more or less) seasoned panko bread crumbs

Directions:
  • Preheat oven to 375.
  • Wash mushrooms, removing any dirt and dry with a paper towel.
  • Remove the stems and finely chop.
  • Heat olive oil in stove over medium heat and add mushroom stems and garlic. Cook until the stems are soft and liquid has evaporated. Set aside a few minutes to cool.
  • Mix together the cheeses, stems and season to taste with salt and pepper.
  • Stuff (and I mean STUFF) the mushrooms with the cheese mixture. Press the cheese top into the breadcrumbs to coat.
  • Place stuffed mushrooms on baking sheet and bake in preheated oven for about 25 minutes, or until the top is crisp and brown and mushrooms are tender.


October 27, 2015

BBQ Grape Meatballs & Happy 10 Years!


You know you work at a good place when your company celebrates its 10 year anniversary by having a party at a tasteful venue with an open bar and unlimited oysters on the half shell. (Not to mention the giant chocolate bars they gave out which made my head look small in comparison.) Being a new employee, it was really cool for me to be a part of the celebration that was such a milestone for our partners and long term employees. Our marketing team made a great video of how the company started which made its debut at the party.  (Click here to see it! Or scroll down for meatballs)

So, without further ado, this post is dedicated to the company that hired me into the role that ultimately inspired the name of the new blog.


Is there an appetizer that is easier to share or more of a crowd pleasing dish, than a hot crock pot of sweet, savory, tender meatballs?

I will answer for you..... No. (Could I have chosen a better blog title?!)


You can stuff them in a sub roll, pile them on spaghetti or rice, or go at them via toothpick (or hands if you ask my brother). Whatever your preference is, there is no wrong.... As long as you don't get sauce on your new blazer at work. Tip of the day: Always keep a spare top in your car.

I have made multiple different meatball recipes that digress from the usual marinara base. One of my favorites is sweet and sour, for which I usually do a ketchup-pineapple-brown sugar sauce (Check out the recipe on my old blog here). I decided to try a recipe similar to what my boyfriend's mom does, one which I have seen stellar reviews online for, and I was instantly sold. It's simple, but the flavors pop and and make your mouth water for more after each bite.


All I think I need to say to convince you is that I brought a crock pot full to work and they were gone by 9:30 am. My coworkers hardly waited for them to fully reheat (let alone wait until lunch time came around). 

Make them for your next holiday party, potluck, or just to brighten the office some day!


Some tips:
- You can alter the sauce ingredients to your taste preference. Feel free to add extra chili sauce or a few squirts of sriracha to turn up the heat
- I strongly recommend doing a beef/pork mixture for this recipe, not just straight beef. It goes better with the flavors.
- Make gluten free meatballs by using GF oats and processing until fine, or using GF bread crumbs


BBQ Grape Meatballs

Ingredients:
Meatballs:
1 lb ground beef
1/2 lb ground pork
1 egg, slightly beaten
1/3 cup parmesan cheese
1/3 cup breadcrumbs
1 tsp garlic powder
1 tsp salt
1 tsp pepper
1/2 tsp chili powder
1/3 cup milk
Sauce:
1 cup BBQ sauce
1 cup grape jelly
1/2 cup chili sauce

Directions:
  • Preheat oven to 400 and line baking sheet with foil.
  • Combine meatball ingredients, mixing with hands if necessary until it is an even mixture.  
  • Roll meat into 1 1/2" balls and place on baking sheet. 
  • Bake in preheated oven for 30 minutes. 
  • Make sauce by mixing the three ingredients directly in the crock pot. 
  • When meatballs are done in the oven, add to crock pot and stir to coat. 
  • Keep warm for serving. 
  • (If making the day in advance like I did, you can add meatballs and sauce in separate bowl to refrigerate over night, then dump into crock pot before heading to your party!)


October 12, 2015

Honey Chipotle Chicken Wings


Football is in full swing and I couldn't be more pumped up for this season. Watching the Pats go 4-0 after all of the the recent drama feels pretty darn good, but I'll tell you there is something that makes another victory even sweeter (or spicier?).

Honey Chipotle Chicken Wings.

If you know me you know I won't let a Sunday in Fall go by without supplementing game day with a homemade snack. I wouldn't consider it a superstition, but at the same time if I didn't cook and we lost, it would be 100% my fault. Therefore, I have plenty of recipes up my sleeve that I am excited to share.


 This recipe is a new one and was named the best wings I've ever made by a unanimous vote (and I have made some delicious wings). The sauce is bursting with the perfect combination of sweet, tangy and spicy. What takes them over the edge is placing them back in the oven after tossing them in the sauce to allow it to thicken and caramelize to the crispy skin.

Can you say "finger lickin' good"?!


A great thing about this recipe is how it is such a crowd pleaser. There's enough spice to cater to your buffalo loving friends, yet they are mellowed by the sweetness and mild enough for the wimps in the house.


Serve with blue cheese and I promise you can't go wrong serving these at the next Pats game!


Honey Chipotle Chicken Wings

Ingredients:
3 lbs chicken wings
salt & pepper to taste
1/2 tsp cumin
1 tsp garlic powder 
1 tbsp olive oil  
1/2 cup ketchup
1/4 cup brown sugar
1/4 cup honey 
2 cloves garlic, minced 
1 minced chili pepper from can w/ adobo sauce + 1 tsp of sauce
2 tsp cider vinegar 
1 tsp dijon mustard
1/4 tsp salt

Directions:
  • Preheat oven to 425 degrees and line a baking sheet with foil.
  • Pat wings dry. Toss them in salt, pepper, garlic powder, cumin and oil. Spread evenly on baking sheet. Don't overcrowd the pan; Use two sheets if necessary. 
  • Bake in preheated oven for 25 minutes, then flip wings over and bake another 20-25 minutes or until skin is brown and crispy. 
  • While wings are cooking, mix all sauce ingredients together in saucepan over stove. Bring to a low boil, stirring frequently then reduce heat and simmer 2-3 minutes. Remove from heat.
  • Toss wings in sauce, then spread back on cookie sheet and cook 5-7 minutes longer to let the sauce caramelize and thicken.
  • Serve with ranch or blue cheese and lots of napkins!


October 8, 2015

Iced Pumpkin Cookies & the New Blog Intro


The last time I wrote a blog post, I was a month away from graduating college having a great time in Orono, Maine. 

Now, 6 months later I am a finance recruiter in Portsmouth and am somehow managing to be having nearly just as much fun. I could list all the things I love about work, but that isn't why you are reading this. My guess is you are hungry. So I will get right to the point.

(After a brief explanation of my inspiration)

My company was running a clothing drive with our local clients to support the Epilepsy Foundation of New England. Below is a picture of the donations gathered from just my office in Portsmouth (one of three locations). We ended up donating 3251 POUNDS of clothing thanks to all of the generous businesses in the local community!

As a thank you to my wonderful clients who had participated, I made my favorite pumpkin cookie recipe. I received a very excited email from one of them asking me to share the recipe because she and her coworkers loved them so much.  Then it hit me.....

How wonderful would it be if I had a place to share all of my favorite recipes with all my favorite clients?! I hadn't thought of my trusty old college food blog in months. I had to think of a new name and theme, because Gourmet Taste for the College Buds wouldn't cut it, as I am now (what I like to consider) a "professional" and of course no longer a student.

Immediately, the brainstorming commenced. My sister and I had a good laugh tossing around some ideas (ie: Biscuits & Blazers, Knife Skills & Corporate Thrills, and some others I don't need to disclose), and finally settled on Cold Calls & Meatballs. (See "About Me" for further explanation.) I am very excited to tap back in to my creative culinary side. I think my coworkers may be excited as well because the more I blog, the more I cook, and they will reap the benefits.

Now after my brief explanation, I can get to the important stuff. The iced pumpkin cookies...

The cookies that will literally put a smile on your face when you take a bite and will have even pumpkin haters asking for the recipe. We've been making them every year since I can remember, so I knew they would be the perfect treat to give my clients for participating in the clothing drive. Turns out I was right!


I brought a box in to the office as well and my coworkers loved them. It's a great way to celebrate the season; Nothing screams fall like pumpkin! Now pair it with spices such as cinnamon, nutmeg and cloves all blanketed in sweet icing. Really, it's perfect. Even your dog will be begging for a bite. (Though she was begging for peas just before this photo was taken so I suppose that isn't the best way to judge the worthiness of a recipe)


The end of the story is if you are craving a simple, fall treat or a good way to impress a client.... consider making these.


Iced Pumpkin Cookies


Ingredients:

Cookies:
2 1/2 cups flour
1 tsp baking powder
1 tsp baking soda
1/2 tsp salt
1/2 tsp nutmeg
1/2 tsp ground cloves
2 tsp cinnamon
1/2 cup butter, softened
1 1/2 cups sugar
1 cup pumpkin puree
1 egg
1 tsp vanilla
Icing:
1 1/2 cups powdered sugar
2 tbsp half & half (or milk)
1 tbsp melted butter
1/2 tsp vanilla 

Directions:
For cookies:
  • Preheat oven to 350
  • Combine flour, baking powder & soda, spices and salt in bowl. Whisk to combine.
  • In medium bowl (kitchen aid mixer preferable) cream together softened butter and sugar until well combined. 
  • Add in pumpkin, vanilla and egg and beat until creamy, stopping to scrape the bottom a couple of times.
  • Pour pumpkin mix into dry ingredients and mix to combine. 
  • Drop on ungreased cookie sheet by tablespoons. 
  • Bake for 17-18 minutes. 
  • Let cool completely before icing. 
For icing:
  • Mix all ingredients together. Add half&half/milk slowly, being careful not to make it too liquidy.
  • Let the icing set on the cookies and store in air tight container.


PS: I've made them without icing and add mini chocolate chips - another crowd pleaser!